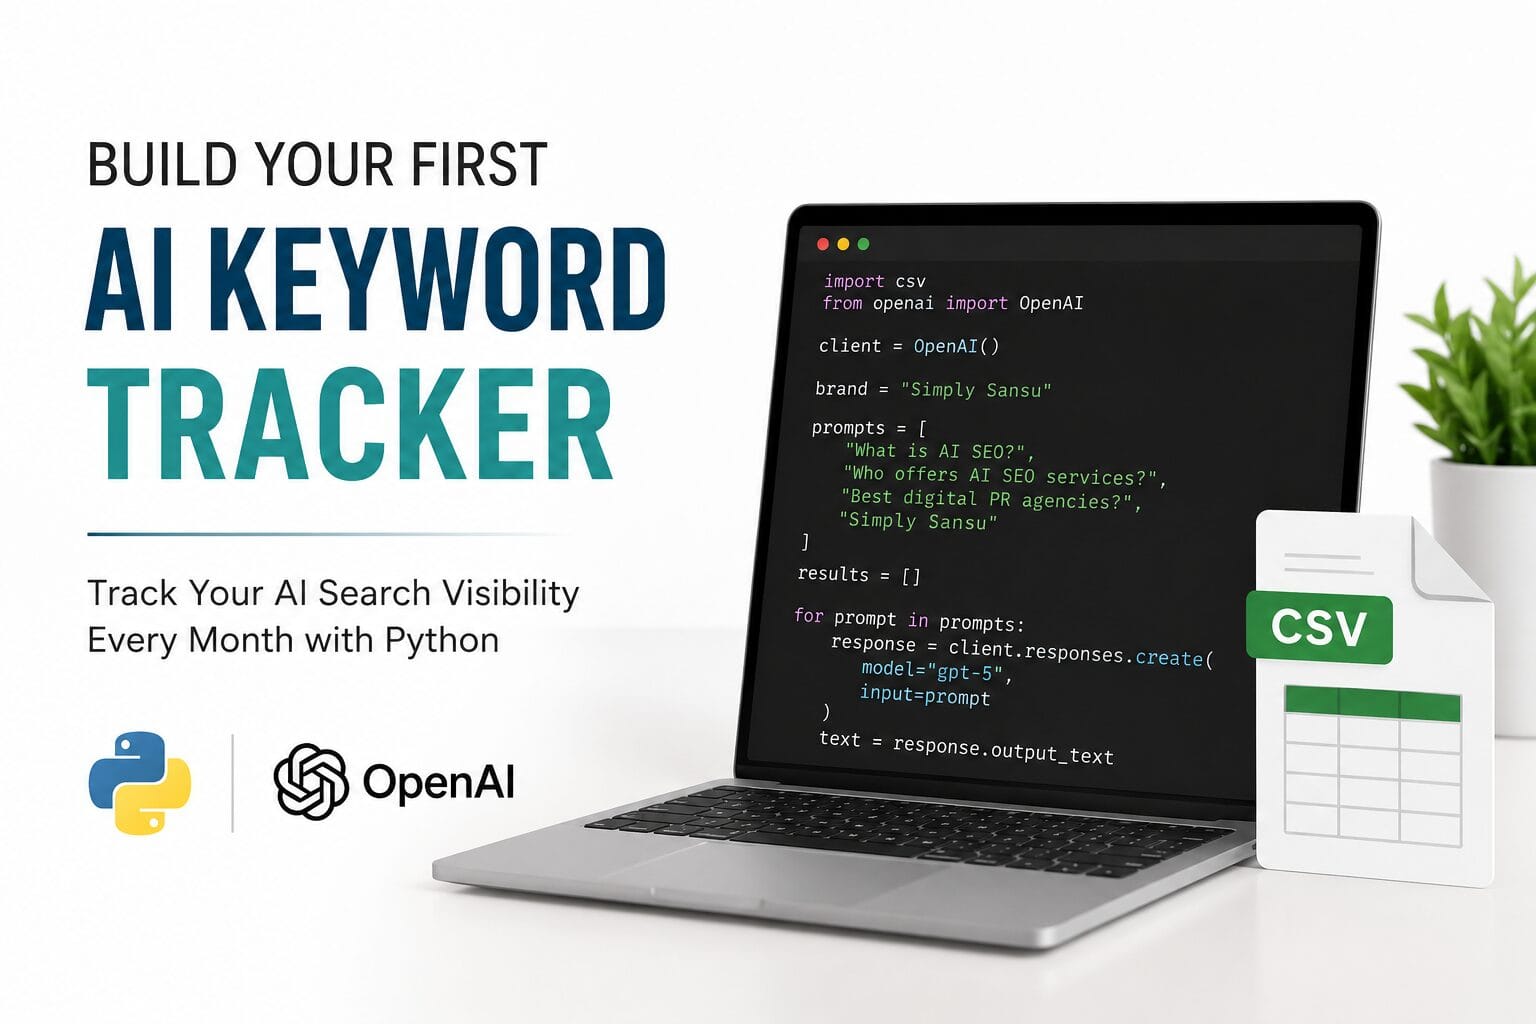
Build Your First AI Keyword Tracker with Python
- Introduction: Why I’m Tracking AI Search Visibility Monthly
- What You’ll Build: See the Finished AI Keyword Tracker
- What You Need Before You Start
- Python
- VS Code
- OpenAI account
- API key
- Installing Python
- Understanding PowerShell, Command Prompt, and the Python Interpreter
- Installing the OpenAI Python Library
- Creating Your First OpenAI Client
- Sending Your First Prompt
- From One Prompt to a Real Project
- Creating Your Monthly Keyword List
- Building the AI Keyword Tracker
- Saving the Results to a CSV File
- Running the Tracker Every Month
- Ideas for Improving the Tracker
- Troubleshooting Guide
- Complete Source Code
- A Few Final Tips
- Tracking AI Search Visibility with Google AI Studio: Workflow Overview
- Conclusion
- Spreadsheet template
Why I’m Tracking AI Search Visibility Every Month
For years, I’ve tracked website performance in Google Search for my clients. Monitoring keyword rankings, impressions, clicks, and organic traffic has always been an essential part of measuring the success of an SEO strategy.
More recently, I launched Simply Sansu, my own website. Since it’s still fairly new, I wanted to document its growth from the very beginning—not just in traditional search engines like Google, but also across AI-powered search experiences.
Search is evolving.
Today, many people begin their journey by asking ChatGPT, Gemini, Claude, or Perplexity instead of typing a query into a traditional search engine. They’re looking for recommendations, answers, and expert opinions, often receiving a single AI-generated response rather than a page of search results.
That made me ask an important question:
How do I measure a brand’s visibility in AI search?
Unlike Google Search Console, there isn’t a built-in dashboard that tells you whether ChatGPT recommends your business, mentions your brand, or surfaces your content for the topics you want to be known for.
Having spent years tracking SEO performance for clients, I wanted to apply the same data-driven approach to AI search. At the same time, my own website gives me the perfect opportunity to experiment, learn, and measure what actually works as it grows.
Instead of manually asking the same questions every month, I decided to automate the process.
Using Python and the OpenAI API, I built a simple script that asks the same set of prompts every month and records the responses. Keeping the prompts consistent allows me to compare results over time and observe whether my website is becoming more visible in AI-generated answers as I publish more content, earn authoritative mentions, and continue investing in SEO and digital PR.
This isn’t about trying to “rank” in ChatGPT. AI assistants don’t work like traditional search engines, and there are no official rankings to track. Instead, I’m looking for meaningful patterns. Is my website being mentioned for the topics I write about? Is my brand appearing more frequently than it did a month ago? Are my SEO and digital PR efforts helping improve my visibility?
When I first started learning Python, I didn’t know the difference between PowerShell and the Python interpreter. I didn’t know what pip was, what an API key did, or why I needed an OpenAI client. I learned by experimenting, making mistakes, and gradually understanding how everything worked together.
That’s exactly why I wrote this guide.
If you’ve never written a line of Python before, don’t worry. I’ll explain every step, every command, and every line of code in plain English. By the end of this guide, you’ll have a simple Python script that you can use to monitor AI search visibility every month, for your own website, your business, or even your clients.
What You’ll Build
By the end of this tutorial, you’ll have a simple Python application that communicates with the OpenAI API. The program will send a prompt to ChatGPT and display the AI-generated response directly in your terminal.
Here’s what the finished application will do:
- Connect to the OpenAI API using your API key.
- Send a prompt to an AI model.
- Receive a response from ChatGPT.
- Display the response in your terminal.
Your finished program will look something like this when you run it:
C:\Users\YourName\Documents\my-first-openai-app> python app.py

You: What is SEO?

ChatGPT:
SEO is the practice of improving a website's visibility in search engines to attract relevant traffic.
Don’t worry if this looks unfamiliar right now. In the following sections, I’ll walk you through every step—from installing Python and creating your first project to running this application successfully.
What You Need Before You Start
Before you begin, make sure you have the following:
- A computer running Windows, macOS, or Linux – This tutorial uses Windows examples, but the steps are similar on other operating systems.
- Python installed – You’ll use Python to write and run your application. If you don’t have it yet, don’t worry—we’ll install it in the next section.
- An OpenAI account – You’ll need an account to access the OpenAI API.
- An OpenAI API key – This key allows your application to securely communicate with OpenAI’s AI models. I’ll show you how to create one later in the tutorial.
- Visual Studio Code (recommended) – While you can use any code editor, VS Code makes it easier to write and run your Python code.
- An internet connection – Your application sends requests to the OpenAI API, so you’ll need to be online when testing it.
Once you have these essentials, you’re ready to start building your first AI-powered application.
Installing Python
If you already have Python installed on your computer, you can skip to the next section. Otherwise, follow these steps to install it.
Step 1: Download Python
Visit the official Python website:
https://www.python.org/downloads
The website will automatically detect your operating system and recommend the latest stable version of Python. Click the Download Python button to begin downloading the installer.
Step 2: Run the Installer
Once the download is complete, open the installer.
Important: Before clicking Install Now, check the box that says:
✅ Add Python to PATH
This step ensures you can run Python from the Command Prompt or terminal without additional configuration.
After selecting the checkbox, click Install Now and wait for the installation to finish.
Step 3: Verify the Installation
After the installation is complete, open Command Prompt:
- Press Windows + R.
- Type
cmd. - Press Enter.
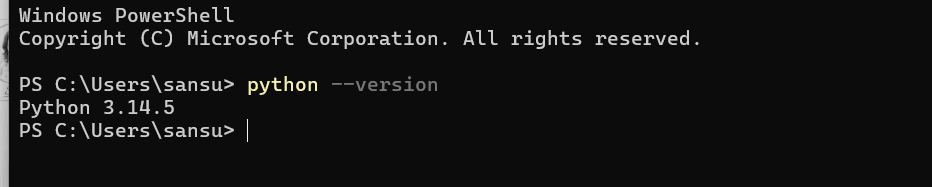
In the Command Prompt window, type:
python --version
Press Enter.
If Python is installed correctly, you’ll see output similar to:
Python 3.14.5Troubleshooting
If you see an error such as:
'python' is not recognized as an internal or external command...It’s likely that Python wasn’t added to your system’s PATH. The easiest fix is to run the Python installer again and make sure Add Python to PATH is checked before reinstalling.
With Python successfully installed, you’re ready to install the OpenAI library and write your first AI application.
Understanding PowerShell, Command Prompt, and the Python Interpreter
Before you start writing code, it’s helpful to understand the different tools you’ll be using. Many beginners confuse these, but each has a different purpose.
Command Prompt (CMD)
Command Prompt is a command-line application built into Windows. It lets you interact with your computer by typing commands instead of clicking buttons.
You’ll use Command Prompt to:
- Check if Python is installed
- Install Python packages
- Run your Python programs
- Navigate between folders
For example:
python --versionThis command tells Windows to run Python and display the installed version.
Windows PowerShell
PowerShell is another command-line tool included with Windows. It can do everything Command Prompt can, along with many advanced system administration tasks.
For this tutorial, you can use either Command Prompt or PowerShell. The commands shown throughout this guide will work in both.
PowerShell usually looks similar to this:
PS C:\Users\YourName>Whereas Command Prompt looks like:
C:\Users\YourName>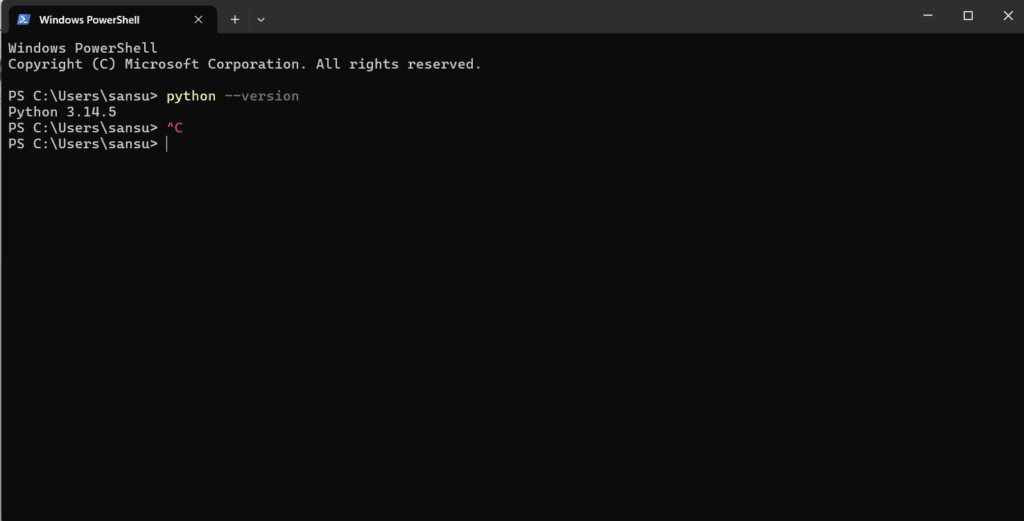
Python Interpreter
The Python interpreter is the program that reads and executes Python code.
There are two common ways you’ll use it:
1. Running a Python script
Suppose you have a file named app.py. You can run it by typing:
python app.pyPython executes every line in the file and displays the results.
2. Interactive Python mode
If you simply type:
pythonyou’ll enter the Python interpreter, which looks something like this:
Python 3.13.2
>>>
The >>> prompt means Python is waiting for you to type code.
For example:
print("Hello, World!")Output:
Hello, World!To exit the Python interpreter, type:
exit()or press Ctrl + Z, then Enter on Windows.

Which One Should You Use?
Think of them as working together:
- Command Prompt or PowerShell is where you type commands to manage files, install packages, and run programs.
- The Python interpreter is the program that actually understands and executes Python code.
Throughout this tutorial, you’ll mostly use Command Prompt or PowerShell to run commands like pip install openai and python app.py. Python will then execute your code and display the results.
Installing the OpenAI Library with pip
Now that Python is installed, you’ll need to install the OpenAI Python library. This library lets your Python application communicate with the OpenAI API without you having to write all the networking code yourself.
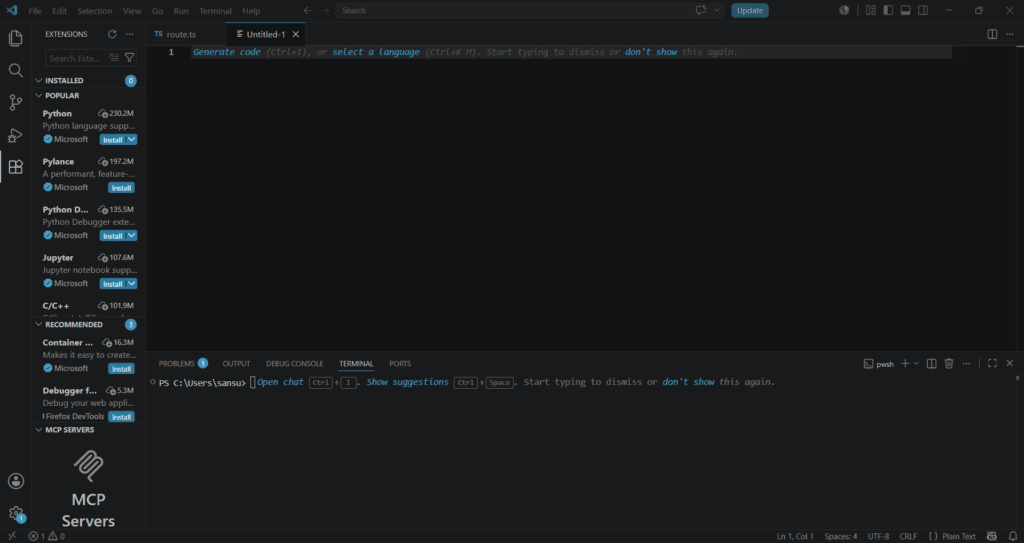
Step 1: Open Your Terminal
Open either Command Prompt or PowerShell.
If you’re using Visual Studio Code, you can also open the integrated terminal by selecting Terminal → New Terminal from the menu.
Step 2: Install the OpenAI Library
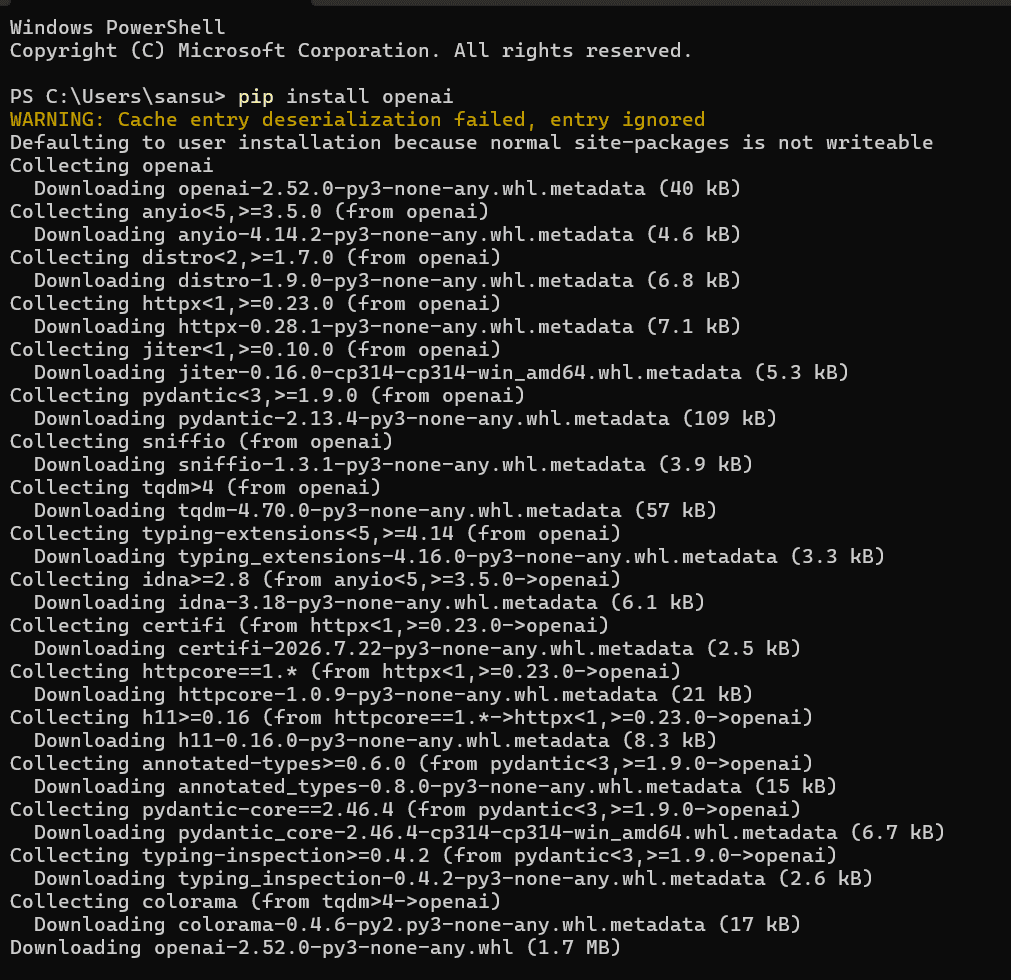
In your terminal, type the following command and press Enter:
pip install openaiPython’s package manager, pip, will download and install the latest version of the OpenAI library along with any required dependencies.
You should see output similar to:
Collecting openai
Downloading openai-...
Installing collected packages...
Successfully installed openai-...


Step 3: Verify the Installation (Optional)
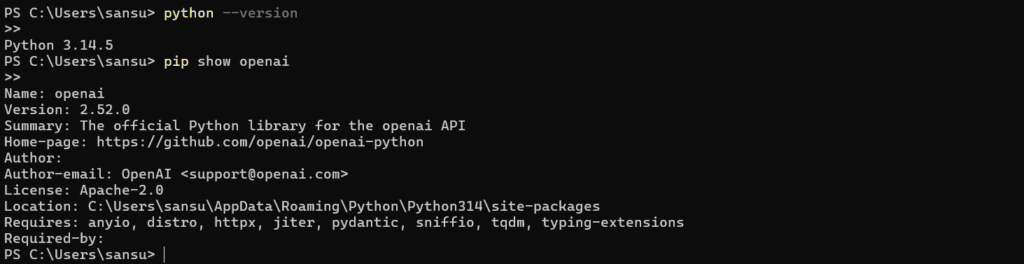
To confirm the library was installed successfully, run:
pip show openaiIf the installation was successful, you’ll see details such as the package name, version, and installation location.
Common Errors and How to Fix Them
Error: 'pip' is not recognized as an internal or external command
This usually means Python wasn’t added to your system’s PATH, or pip isn’t available from your current terminal.
Try using:
python -m pip install openaiIf that works, you can continue using python -m pip whenever you install Python packages.
Error: No module named 'openai'
This means the OpenAI library isn’t installed in the version of Python you’re currently using.
Run:
python -m pip install openaiThen try running your program again.
Error: Python was not found
Windows can’t locate your Python installation.
Make sure Python is installed correctly and that Add Python to PATH was selected during installation. If necessary, reinstall Python and enable this option.
Error: Permission denied or Access is denied
Try closing and reopening your terminal, or run Command Prompt or PowerShell as an administrator. In most cases, simply reopening the terminal resolves the issue.
Error: Installation Fails Due to Network Issues
If you’re behind a firewall, proxy, or have an unstable internet connection, pip may be unable to download packages. Check your internet connection and try the installation again.
Once the installation completes successfully, you’re ready to connect your application to the OpenAI API and start building your first AI-powered program.
Creating Your First OpenAI Client
Now that you’ve installed the OpenAI library, it’s time to write your first Python program.
In this section, you’ll create an OpenAI client. Think of the client as the bridge between your Python application and the OpenAI API. It handles sending your requests and receiving responses.
In File Explorer, create a folder named:
my-first-openai-appYou can create it anywhere you like, for example:
C:\Users\sansu\Documents\my-first-openai-app

Open the Folder in VS Code
Open Visual Studio Code.
Click File → Open Folder...
Select my-first-openai-app.
Click Select Folder.

Create Your First Python File
In the Explorer panel on the left:
- Click the New File icon (📄 with a +).
- Type:
app.py- Press Enter.
You should now see:
my-first-openai-app
└── app.py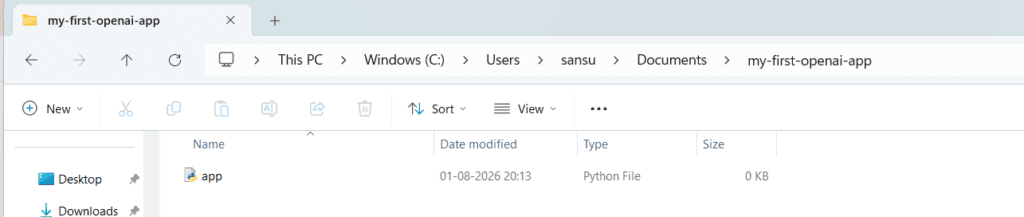
Add Your First Code
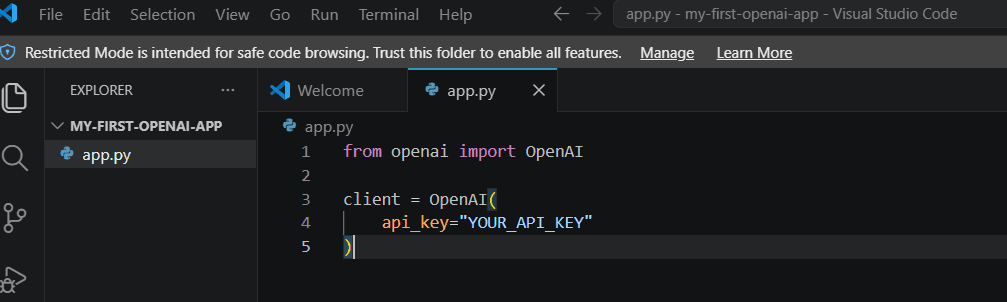
Paste the following code into app.py:
from openai import OpenAI

client = OpenAI(
    api_key="YOUR_API_KEY"
)
Save the file by pressing Ctrl + S.
Run the Program
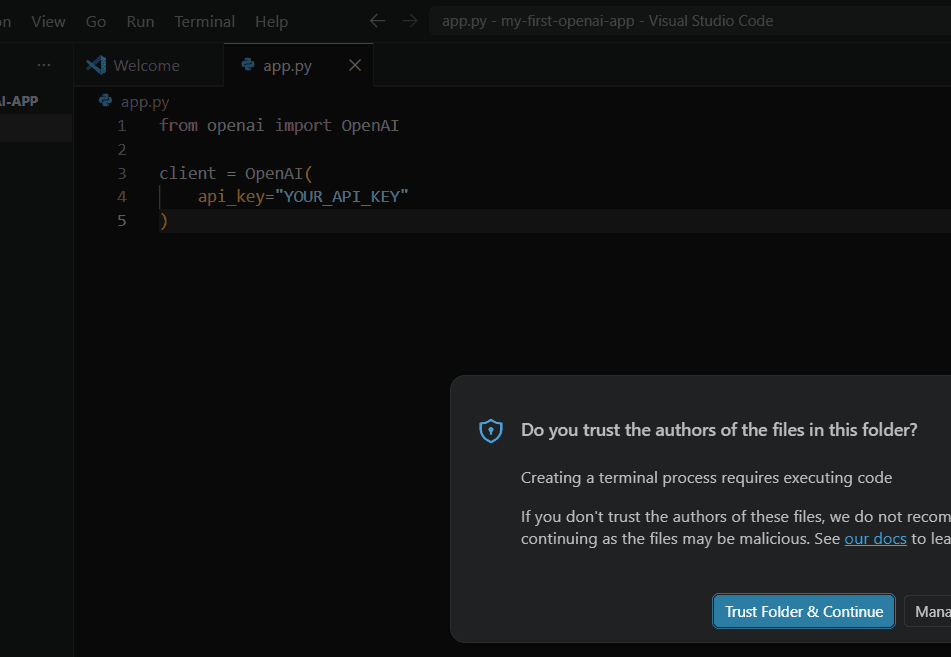
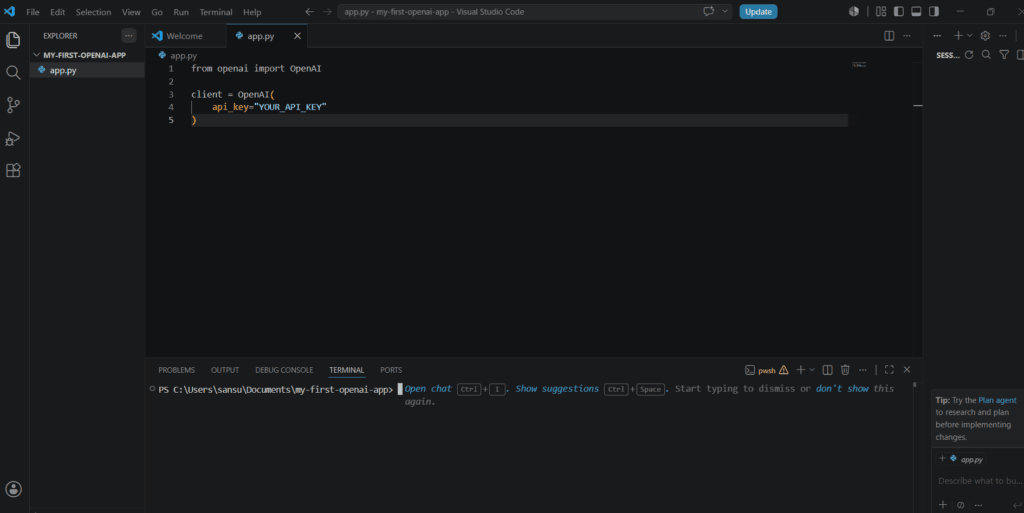
Open Terminal → New Terminal.
The terminal should automatically open in your project folder, something like:
PS C:\Users\sansu\Documents\my-first-openai-app>Now run:
python app.pyAt this point, you won’t see any output because the program only creates the client—it doesn’t ask the AI anything yet. In the next section, you’ll add code to send your first prompt and print the response.

What should happen?
After running
python app.py, you won’t see any output. That’s expected. At this stage, your program only creates an OpenAI client. It hasn’t sent a request to the API yet.If your terminal returns to the prompt without displaying an error, your client has been created successfully.
Sending Your First Prompt
Now that you’ve successfully created an OpenAI client, let’s use it to send your first prompt. Add the following lines below the code you’ve already written.
Then only introduce the new code:
response = client.responses.create(
    model="gpt-5",
    input="What is SEO?"
)

print(response.output_text)
Your file will now look like this:
from openai import OpenAI

client = OpenAI(
    api_key="YOUR_API_KEY"
)

response = client.responses.create(
    model="gpt-5",
    input="What is SEO?"
)

print(response.output_text)
Notice that the first part:
from openai import OpenAI

client = OpenAI(
    api_key="YOUR_API_KEY"
)
is already there from the previous section. You’re only adding:
response = client.responses.create(
    model="gpt-5",
    input="What is SEO?"
)

print(response.output_text)
Important: Never share your API key or commit it to GitHub. Anyone with your key can use your API credits.
What Have We Accomplished?
Although your program doesn’t produce any output yet, you’ve completed an important first step.
Your application now:
- Imports the OpenAI library.
- Creates an OpenAI client.
- Authenticates using your API key.
- Is ready to send requests to an AI model.
In the next section, you’ll use this client to send your first prompt and receive a response from ChatGPT.
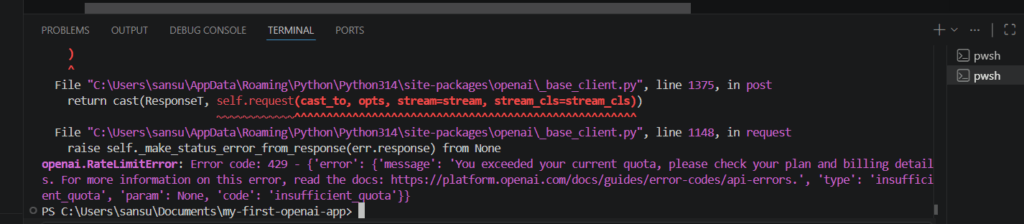
Troubleshooting: Error 429 – Insufficient Quota
If you see an error like this:
openai.RateLimitError: Error code: 429

insufficient_quota
don’t worry—your Python code is most likely correct.
This error means your application successfully connected to the OpenAI API, but your account doesn’t have enough API quota to process the request. This can happen if you haven’t set up billing or you’ve used all of your available API credits.
To resolve the issue:
- Sign in to your OpenAI Platform account.
- Go to Billing and check that you have an active payment method or available API credits.
- Once your account has sufficient quota, run your program again.
Note: A ChatGPT subscription (such as Go, Plus, or Pro) and the OpenAI API are separate services. Having a ChatGPT subscription does not automatically include API credits. You must have an API-enabled account with available quota to make API requests.
After updating your billing or adding credits, run your program again:
python app.pyIf everything is configured correctly, your application will display the AI-generated response in the terminal.
Building the Monthly AI Keyword Tracker
So far, you’ve learned how to connect to the OpenAI API and send a simple prompt. Now let’s build something practical that you can use every month.
In this project, you’ll create an AI-powered keyword tracker that analyzes your keywords and organizes them into a structured report. Instead of manually reviewing long keyword lists, your application will use AI to identify trends, group related keywords, and provide useful insights.
Whether you’re an SEO professional, content marketer, business owner, or blogger, this simple tool can save time and help you make better content decisions.
Now it’s time to bring everything together. In this section, you’ll transform your simple OpenAI application into an AI search visibility tracker.
You’ll learn how to:
- Import the
csvmodule. - Create a variable to store your brand name.
- Build a list of prompts to track each month.
- Use a
forloop to process each prompt automatically. - Send each prompt to the OpenAI API using
client.responses.create(). - Check whether your brand is mentioned in the AI’s response.
By the end of this section, you’ll have a working tracker that analyzes multiple prompts and prepares the results to be saved in a CSV file.
What You’ll Build
By the end of this section, you’ll have a Python application that:
- Reads a list of keywords.
- Sends them to the OpenAI API.
- Asks AI to categorize and analyze the keywords.
- Displays the results in a clear, organized format.
- Optionally saves the results for future monthly comparisons.
For example, suppose your keyword list contains:
AI SEO
ChatGPT SEO
Digital PR
Link Building
Technical SEO
Content Marketing
Google AI Overview
Your application might produce something like:
Category: AI Search
- AI SEO
- ChatGPT SEO
- Google AI Overview

Category: SEO
- Technical SEO
- Link Building

Category: Content
- Content Marketing

Category: PR
- Digital PR
Why Build a Keyword Tracker?
As your website grows, you’ll likely monitor dozens or even hundreds of keywords each month.
Instead of reviewing them manually, AI can help you:
- Identify related keyword groups.
- Spot emerging content opportunities.
- Organize keywords by topic or intent.
- Generate ideas for new blog posts.
- Reduce the time spent analyzing keyword data.
Even this simple project demonstrates how AI can automate repetitive SEO tasks.
How It Works
Your application follows the same workflow you’ve already learned:
- Read a list of keywords.
- Create a prompt for the AI.
- Send the prompt to the OpenAI API.
- Receive the AI’s response.
- Display or save the results.
The difference is that you’re now sending multiple keywords instead of a single question.
From One Prompt to a Real Project
When I first started, my goal wasn’t to build a tracking tool. I simply wanted to ask ChatGPT a question and see whether my website appeared in the response.
That single prompt sparked a much bigger idea.
Instead of manually asking the same questions every month, why not automate the process? Why not use Python to submit the prompts, capture the responses, and compare them over time?
As I explored the OpenAI API, I realized this was something anyone could build—even with very little programming experience. Every new concept I learned, from installing Python and using pip to creating an OpenAI client and sending my first API request, became another building block in what eventually turned into a simple AI search visibility tracker.
What began as an experiment with a single prompt is gradually evolving into a practical tool that helps me monitor how AI platforms mention my website today and how that visibility changes over time.
Creating Your Monthly Keyword List
Before writing any code, you need to decide what you want to track.
The most important rule is to use the same prompts every month. If you keep changing the questions, it becomes difficult to tell whether your AI visibility has genuinely improved or if the results changed simply because you asked something different.
Think of these prompts as the AI equivalent of the keywords you track in Google Search. They should reflect the topics you want your website or brand to be known for.
For example, because I write about AI SEO, digital PR, and SEO, my monthly keyword list includes prompts such as:
prompts = [
    "What is AI SEO?",
    "Who offers AI SEO services?",
    "Best AI SEO consultants",
    "What is digital PR?",
    "Best digital PR agencies",
    "How do I improve AI search visibility?",
    "Who is Sansu Abraham?",
    "Simply Sansu"
]
Don’t worry if your list is short when you’re starting. Even 10 to 20 carefully chosen prompts can provide valuable insights.
How should you choose your prompts?
Ask yourself questions like:
- What services do I offer?
- What topics do I create content about?
- What products do I sell?
- What questions do I want AI assistants to answer using my content?
- How might a potential customer phrase their question?
For example:
- A local bakery might track “Best bakery in Ahmedabad” or “Where can I buy fresh sourdough bread?”
- A software company might track “Best CRM for small businesses.”
- A travel blogger could monitor “Things to do in Kerala.”
Choose prompts that are relevant to your business and that someone might realistically ask an AI assistant.
Why consistency matters
If you ask “What is AI SEO?” this month, ask the exact same question next month.
Changing it to “Explain AI SEO.” or “Tell me about AI SEO.” may produce different responses, making it harder to compare results over time.
By using the same prompts every month, you’ll build a reliable history of how AI platforms respond. Over time, you’ll be able to identify trends, spot improvements, and see whether your content, SEO, and digital PR efforts are increasing your visibility in AI-generated answers.
In the next section, we’ll take this list of prompts and use Python to automatically send each one to OpenAI, one after another.
Saving the Results to a CSV File
Seeing the AI’s response on your screen is useful, but once you close the terminal, it’s gone.
If you’re serious about tracking AI search visibility, you’ll want to keep a record of every response. That’s where a CSV (Comma-Separated Values) file comes in.
A CSV file is a simple spreadsheet format that can be opened in Microsoft Excel, Google Sheets, Apple Numbers, or any other spreadsheet application. It allows you to store your results month after month so you can compare changes over time.
Instead of manually copying and pasting every response, Python can do it for you automatically.
Step 1: Import the CSV Library
Python includes a built-in library called csv, so you don’t need to install anything extra.
At the top of your script, add:
import csv
This tells Python that you’ll be working with CSV files.
Step 2: Open or Create the CSV File
Next, tell Python where to save the results.
with open("ai_visibility_results.csv", "w", newline="", encoding="utf-8") as file:
Let’s break this down.
with open()opens a file so Python can work with it."ai_visibility_results.csv"is the filename. If it doesn’t already exist, Python will create it."w"means write mode. Each time you run the script, the existing file will be replaced with a new one.newline=""prevents blank lines from appearing between rows, especially on Windows.encoding="utf-8"ensures special characters are saved correctly.
Step 3: Create a CSV Writer
Now create a writer that knows how to write rows into the CSV file.
writer = csv.writer(file)
Think of the writer as the tool that fills in your spreadsheet.
Step 4: Add Column Headings
Every spreadsheet should have column headings.
writer.writerow([
    "Prompt",
    "AI Response",
    "Brand Mentioned"
])
This creates the first row of the file.
| Prompt | AI Response | Brand Mentioned |
|---|
Step 5: Save Each Result
Inside your loop, after receiving the AI’s response, save the information.
writer.writerow([
    prompt,
    response.output_text,
    brand_found
])
Here’s what each value represents:
prompt– The question you asked.response.output_text– The complete response generated by GPT.brand_found– Whether your brand was mentioned.
Every time the loop runs, Python adds another row to the CSV file.
Example Output
After running the script, your spreadsheet might look like this:
| Prompt | AI Response | Brand Mentioned |
|---|---|---|
| What is AI SEO? | AI SEO refers to… | Yes |
| Best AI SEO consultants | Several consultants include… | No |
| Who is Sansu Abraham? | Sansu Abraham is… | Yes |
As your list of prompts grows, so will your spreadsheet.
Why This Matters
Saving your results is what transforms a simple script into a tracking system.
Instead of relying on memory, you’ll have a historical record that you can revisit at any time.
Over the coming months, you’ll be able to answer questions like:
- Is my brand appearing in more AI-generated responses?
- Which prompts mention my website consistently?
- Which prompts never mention my brand?
- Are my content updates and digital PR efforts improving my AI visibility?
Without saving the data, every run of the script is just a one-time snapshot.
With a CSV file, you begin building a timeline that lets you measure progress month after month.
In the next section, we’ll improve the tracker further by adding the current date to each record so you can compare results across multiple months without creating a new file every time.
Running the Tracker Every Month
Now that you’ve built your AI search visibility tracker, the final step is the easiest one—running it consistently.
The value of this project doesn’t come from checking your visibility once. It comes from comparing your results over time.
I plan to run my tracker once every month using the same set of prompts. This gives me a consistent way to monitor whether my website, which is still fairly new, is becoming more visible in AI-generated responses. It also allows me to observe how ongoing content publishing, SEO, and digital PR efforts influence that visibility over time.
The process is simple.
Step 1: Open PowerShell or Command Prompt
On Windows, click the Start button and search for either:
- PowerShell, or
- Command Prompt
Open either application.
Step 2: Navigate to Your Project Folder
If your Python script is stored in another folder, you’ll need to navigate to it first.
For example:
cd C:\Users\YourName\Documents\AI-Tracker
Replace the folder path with the location where you saved your project.
To check where you are currently, type:
pwd
PowerShell will display your current folder.
Step 3: Run Your Script
Once you’re in the correct folder, run your tracker by typing:
python tracker.py
If your file has a different name, replace tracker.py with the actual filename.
For example:
python ai_visibility_tracker.py
Then press Enter.
Python will begin processing each prompt one by one.
As the script runs, you’ll see each prompt being sent to OpenAI, followed by the AI’s response.
When the script finishes, your CSV file will be updated with the latest results.
Step 4: Review Your Results
Open the CSV file in Microsoft Excel or Google Sheets.
If you’ve configured your script to append new records instead of replacing the file, you’ll gradually build a month-by-month history of your AI search visibility.
Over time, you can answer questions such as:
- Is my brand appearing for more prompts than it did last month?
- Which prompts consistently mention my website?
- Which topics still need stronger content?
- Are my SEO and digital PR efforts improving my AI visibility?
Stay Consistent
One of the most important parts of this project has nothing to do with Python.
Keep using the same prompts every month.
Changing your prompts makes it difficult to compare results fairly. By asking the same questions in the same order, you’ll be able to identify genuine trends rather than differences caused by changing the wording.
Remember, this tracker isn’t designed to prove that you’ve “ranked” in an AI assistant. Instead, it’s a practical way to monitor how often your brand is mentioned, how relevant those mentions are, and how your visibility evolves over time.
As your website grows and your content earns more authority, you’ll have a growing dataset that helps you understand whether your efforts are making a measurable difference in AI search.
Ideas for Improving the Tracker
Congratulations! You’ve built a working AI search visibility tracker using Python and the OpenAI API.
While it’s a simple project, it gives you a solid foundation to build on. As you become more comfortable with Python, you can gradually add new features to make the tracker even more useful.
Here are a few ideas I’m planning to explore next.
1. Track More Prompts
Right now, you might be checking just a handful of prompts.
Over time, you can expand your list to include:
- Service-related questions
- Product-related questions
- Brand name searches
- Competitor comparisons
- Industry-specific questions
- Frequently asked customer questions
The more relevant prompts you track, the better you’ll understand how your brand appears across different AI-generated responses.
2. Read Prompts from a CSV File
Instead of hardcoding your prompts inside the Python script, you could store them in a CSV file.
That means adding, removing, or editing prompts becomes as simple as updating a spreadsheet—no changes to your Python code required.
This is especially useful if you’re tracking multiple websites or managing several clients.
3. Add More Information to Your Results
Currently, we’re saving the prompt, the AI response, and whether the brand was mentioned.
You could also include:
- Date and time
- AI model used
- Response length
- Number of brand mentions
- Notes or observations
- Client or project name
The more context you record, the more meaningful your reports become over time.
4. Highlight Brand Mentions Automatically
Instead of simply recording whether your brand was mentioned, you could enhance the script to:
- Count how many times your brand appears.
- Highlight the exact sentence where it was mentioned.
- Detect mentions of your competitors.
- Compare your visibility with other brands.
This can provide a much deeper understanding of how AI assistants discuss your brand.
5. Generate Charts
Numbers are useful, but charts make trends easier to understand.
As your monthly data grows, you could create graphs showing:
- Monthly brand mentions
- Percentage of prompts mentioning your brand
- Visibility trends over time
- Comparisons between different projects or clients
Visualizing your data makes it easier to identify improvements and share progress with others.
6. Test Different AI Models
This tutorial uses GPT through the OpenAI API, but you may eventually want to compare responses from other AI platforms if they provide APIs that fit your needs.
Each AI assistant has its own way of generating responses, so comparing them can reveal interesting differences in how brands are mentioned and recommended.
7. Schedule the Script to Run Automatically
Instead of remembering to run the tracker manually each month, you could automate the process.
On Windows, Task Scheduler can launch your Python script on a specific day every month.
That means your tracker runs in the background, updates the CSV file, and keeps your historical data growing with little effort.
8. Build a Dashboard
Once you have several months of data, you could create a dashboard to make the results easier to explore.
For example, you could use:
- Microsoft Excel
- Google Sheets
- Power BI
- Looker Studio
- A simple Python dashboard
Seeing everything in one place makes it much easier to identify long-term trends.
My Next Goal
This project started with a simple question:
“Can I use Python to check whether my website appears in AI-generated responses?”
The answer was yes.
Now I want to take it further.
Over the coming months, I’ll continue improving this tracker by adding new features, experimenting with different approaches, and documenting everything I learn along the way.
If you’re following this guide, I encourage you to do the same.
You don’t need to build the perfect tool on day one. Start with something simple, run it consistently, and improve it one feature at a time.
That’s exactly how this project began—and it’s how many useful tools are built.
Complete Source Code
If you’ve followed this guide step by step, here’s the complete Python script in one place. You can copy it into a new Python file (for example, ai_visibility_tracker.py) and run it whenever you want to check your AI search visibility.
from openai import OpenAI
import csv

# Create an OpenAI client
# Replace YOUR_API_KEY with your actual OpenAI API key
client = OpenAI(api_key="YOUR_API_KEY")

# Brand name to check for
brand = "Simply Sansu"

# List of prompts to track every month
prompts = [
    "What is AI SEO?",
    "Who offers AI SEO services?",
    "Best AI SEO consultants",
    "What is digital PR?",
    "Best digital PR agencies",
    "Who is Sansu Abraham?",
    "Simply Sansu"
]

# Create a CSV file
with open("ai_visibility_results.csv", "w", newline="", encoding="utf-8") as file:

    writer = csv.writer(file)

    # Create column headings
    writer.writerow([
        "Prompt",
        "AI Response",
        "Brand Mentioned"
    ])

    # Process each prompt
    for prompt in prompts:

        print(f"Checking: {prompt}")

        response = client.responses.create(
            model="gpt-5",
            input=prompt
        )

        ai_response = response.output_text

        # Check whether the brand appears
        if brand.lower() in ai_response.lower():
            brand_found = "Yes"
        else:
            brand_found = "No"

        # Save the result
        writer.writerow([
            prompt,
            ai_response,
            brand_found
        ])

        print(ai_response)
        print("-" * 50)

print("Tracking complete!")
print("Results saved to ai_visibility_results.csv")
What This Script Does
When you run the script, it performs the following steps:
- Imports the required Python libraries.
- Connects to OpenAI using your API key.
- Creates a list of prompts to monitor.
- Sends each prompt to GPT-5.
- Collects the AI’s response.
- Checks whether your chosen brand name appears in the response.
- Saves the prompt, response, and result to a CSV file.
- Repeats the process for every prompt in your list.
By the time the script finishes running, you’ll have a spreadsheet containing the latest AI responses for all of your tracked prompts.
A Few Final Tips
This tutorial is intentionally simple. The goal wasn’t to build a sophisticated AI monitoring platform—it was to help you understand the fundamentals of working with Python and the OpenAI API.
Once you’re comfortable with the basics, you can gradually improve the tracker by:
- Reading prompts from a CSV file instead of hardcoding them.
- Adding today’s date to every record.
- Appending new results instead of replacing the CSV each month.
- Tracking multiple brands or clients.
- Comparing responses from different AI models.
- Building charts and dashboards to visualize trends.
Remember, every project starts with a first version. Mine did too.
I hope this guide gives you the confidence to write your first Python script, experiment with the OpenAI API, and begin tracking your own AI search visibility. Whether you’re monitoring your own website or helping clients understand their presence in AI-generated responses, this simple tracker is a practical place to start.
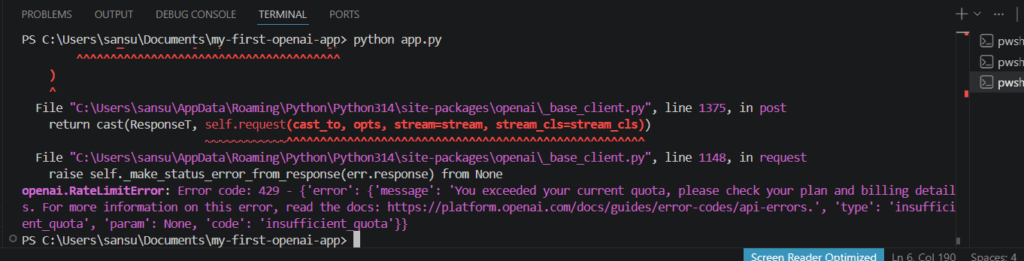
Thescript is working exactly as expected up to the point where it contacts the OpenAI API.
Notice what happened:
Checking: What is AI SEO?This means the program successfully:
- ✅ Imported the OpenAI library.
- ✅ Created the OpenAI client.
- ✅ Read the first prompt from your
promptslist. - ✅ Entered the
forloop. - ✅ Attempted to send the request to the OpenAI API.
It failed only because the API returned:
Error 429
insufficient_quota
So the problem is not the Python code.
The API account has no available API quota.
For example(Sample Output):
| Prompt | AI Response | Brand Mentioned |
|---|---|---|
| What is AI SEO? | AI SEO is the practice of optimizing content to improve visibility in AI-powered search experiences. | No |
| Who is Sansu Abraham? | Sansu Abraham is a digital marketer, digital PR specialist, and founder of Simply Sansu. | Yes |
| Simply Sansu | Simply Sansu provides resources on SEO, AI SEO, and digital PR. | Yes |
Tracking AI Search Visibility with Google AI Studio: Workflow Overview
Many marketers associate AI search tracking with OpenAI, but the same approach can be implemented using Google AI Studio and the Gemini API. Instead of checking traditional search rankings, this workflow measures how often your brand or website appears in AI-generated responses.
Workflow
Define Your Prompts
        │
        ▼
Send Prompt to Gemini API
        │
        ▼
Receive AI Response
        │
        ▼
Extract Brand Mentions & Position
        │
        ▼
Store Results (CSV or Google Sheets)
        │
        ▼
Compare with Previous Months
        │
        ▼
Analyze Visibility Trends
Step-by-Step Process
1. Define Your Prompts
Create a consistent list of prompts that reflect how your target audience might search.
Examples:
- Best AI SEO agencies
- Top ecommerce SEO consultants
- Recommend digital PR agencies
- Who offers AI SEO services?
- Best SEO expert in India
Using the same prompts every month ensures meaningful comparisons.
2. Send Prompts to Gemini
A Python script sends each prompt to the Gemini API using Google AI Studio.
3. Collect the Responses
The script records Gemini’s complete response for every prompt.
4. Detect Brand Mentions
The response is analyzed to determine:
- Whether your brand is mentioned
- Its position in the list (if applicable)
- The surrounding context or explanation
5. Save the Data
Store the results in a CSV file or Google Sheet.
6. Track Changes Over Time
Run the tracker monthly using the same prompts to identify trends such as:
- New AI citations
- Improved visibility
- Lost mentions
- Changes in ranking position
Why This Matters
Unlike traditional SEO tools, this workflow focuses on AI-generated answers rather than search engine rankings. It helps answer questions such as:
- Is my website being cited by Gemini?
- Which prompts mention my brand?
- Has my visibility improved over time?
- Which topics generate the most AI exposure?
Tools Required
- Google AI Studio
- Gemini API
- Python
- VS Code (or another Python IDE)
- CSV or Google Sheets for storing results
Can the Same Workflow Be Used with Other AI Models?
Yes. The workflow remains almost identical regardless of the AI provider. The only component that changes is the API.
Python Script
      │
      ├── OpenAI API (ChatGPT)
      ├── Gemini API (Google AI Studio)
      ├── Claude API
      └── Other supported AI APIs
This makes it possible to build a single AI visibility tracker that compares how different AI assistants mention your brand using the same prompts and methodology.
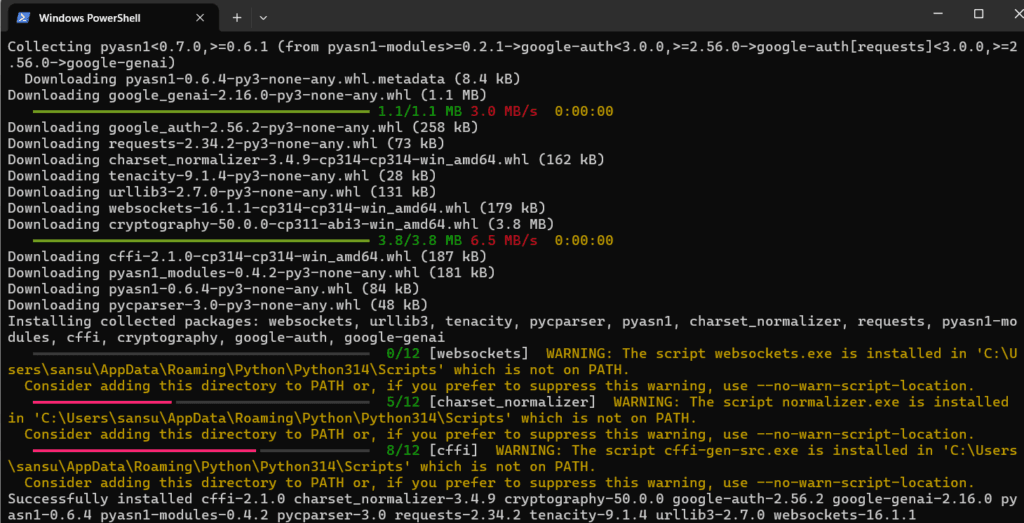
install the required SDKs:
pip install openai google-genai anthropic requests

Set these environment variables:
OPENAI_API_KEY=your_openai_key
GEMINI_API_KEY=your_gemini_key
ANTHROPIC_API_KEY=your_claude_key
PERPLEXITY_API_KEY=your_perplexity_key

Create a .env file in the same folder as your app.py and save all the environment variables.
Install python-dotenv

If you haven't already:

pip install python-dotenv
Before you run it
Make sure you’ve installed all dependencies:
pip install openai google-genai anthropic requests python-dotenvThen use this app.py:
import os
import csv
from datetime import datetime
from dotenv import load_dotenv
from openai import OpenAI
from google import genai
import anthropic
import requests
# ———————–
# LOAD ENVIRONMENT VARIABLES
# ———————–
load_dotenv()
# ———————–
# CONFIGURATION
# ———————–
BRAND = “Simply Sansu”
PROMPTS = [
“What is AI SEO?”,
“Who offers AI SEO services?”,
“Best AI SEO consultants”,
“What is digital PR?”,
“Best digital PR agencies”,
“Who is Sansu Abraham?”,
“Simply Sansu”
]
# ———————–
# API KEYS
# ———————–
OPENAI_API_KEY = os.getenv(“OPENAI_API_KEY”)
GEMINI_API_KEY = os.getenv(“GEMINI_API_KEY”)
ANTHROPIC_API_KEY = os.getenv(“ANTHROPIC_API_KEY”)
PERPLEXITY_API_KEY = os.getenv(“PERPLEXITY_API_KEY”)
# ———————–
# CLIENTS
# ———————–
openai_client = OpenAI(api_key=OPENAI_API_KEY) if OPENAI_API_KEY else None
gemini_client = genai.Client(api_key=GEMINI_API_KEY) if GEMINI_API_KEY else None
claude_client = (
anthropic.Anthropic(api_key=ANTHROPIC_API_KEY)
if ANTHROPIC_API_KEY
else None
)
# ———————–
# PROVIDER FUNCTIONS
# ———————–
def ask_openai(prompt):
response = openai_client.responses.create(
model=”gpt-5″,
input=prompt
)
return response.output_text
def ask_gemini(prompt):
response = gemini_client.models.generate_content(
model=”gemini-2.5-flash”,
contents=prompt
)
return response.text
def ask_claude(prompt):
response = claude_client.messages.create(
model=”claude-sonnet-4″,
max_tokens=1000,
messages=[
{
“role”: “user”,
“content”: prompt
}
]
)
return response.content[0].text
def ask_perplexity(prompt):
headers = {
“Authorization”: f”Bearer {PERPLEXITY_API_KEY}”,
“Content-Type”: “application/json”
}
payload = {
“model”: “sonar”,
“messages”: [
{
“role”: “user”,
“content”: prompt
}
]
}
response = requests.post(
“https://api.perplexity.ai/chat/completions”,
headers=headers,
json=payload,
timeout=60
)
response.raise_for_status()
return response.json()[“choices”][0][“message”][“content”]
# ———————–
# AVAILABLE PROVIDERS
# ———————–
providers = {}
if openai_client:
providers[“OpenAI”] = ask_openai
else:
print(“⚠ OpenAI API key not found. Skipping.”)
if gemini_client:
providers[“Gemini”] = ask_gemini
else:
print(“⚠ Gemini API key not found. Skipping.”)
if claude_client:
providers[“Claude”] = ask_claude
else:
print(“⚠ Claude API key not found. Skipping.”)
if PERPLEXITY_API_KEY:
providers[“Perplexity”] = ask_perplexity
else:
print(“⚠ Perplexity API key not found. Skipping.”)
# ———————–
# OUTPUT FILE
# ———————–
filename = “ai_visibility_results.csv”
with open(filename, “w”, newline=””, encoding=”utf-8″) as file:
writer = csv.writer(file)
writer.writerow([
“Date”,
“Provider”,
“Prompt”,
“Brand Mentioned”,
“AI Response”
])
today = datetime.now().strftime(“%Y-%m-%d”)
for provider_name, provider_function in providers.items():
print(f”\n{‘=’ * 15} {provider_name} {‘=’ * 15}”)
for prompt in PROMPTS:
print(f”Checking: {prompt}”)
try:
ai_response = provider_function(prompt)
brand_found = (
“Yes”
if BRAND.lower() in ai_response.lower()
else “No”
)
writer.writerow([
today,
provider_name,
prompt,
brand_found,
ai_response
])
print(f”✓ Brand Mentioned: {brand_found}”)
except Exception as e:
writer.writerow([
today,
provider_name,
prompt,
“ERROR”,
str(e)
])
print(f”✗ Error: {e}”)
print(“\n===================================”)
print(“Tracking complete!”)
print(f”Results saved to {filename}”)
print(“===================================”)
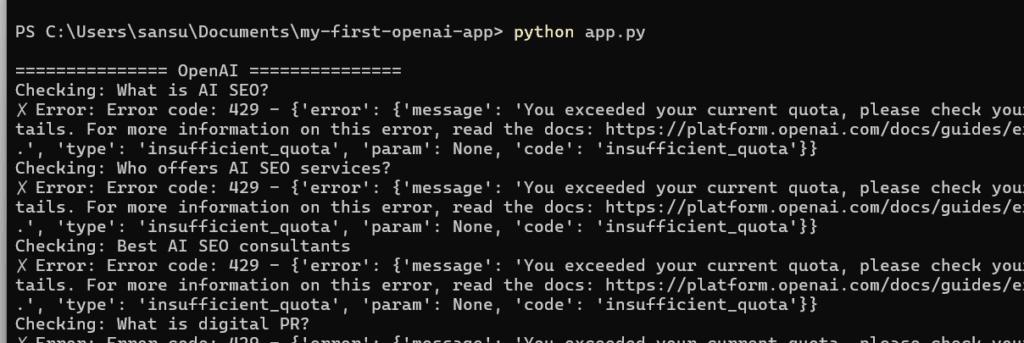
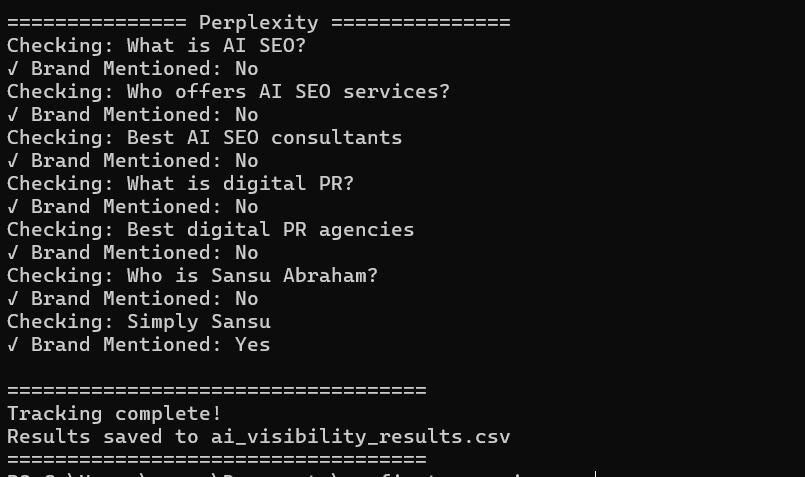
After saving app.py and .env, open a new terminal in VS Code  and make sure you're in the correct foder. Now, run the script, python app.py.
=============== OpenAI ===============
Checking: What is AI SEO?
✓ Brand Mentioned: Yes

Checking: Who offers AI SEO services?
✓ Brand Mentioned: No

=============== Gemini ===============
Checking: What is AI SEO?
✓ Brand Mentioned: Yes

...
Tracking complete!
Results saved to ai_visibility_results.csv
Conclusion
I built my first AI search visibility tracker using Python and the OpenAI API.
While this is a simple project, it demonstrates how AI can automate repetitive tasks and help you monitor your online presence over time. I hope this guide has given you the confidence to build your own AI-powered tools.
Happy coding!
models/gemini-2.5-flash is no longer available to new users Quota exceeded limit: 5 requests per minute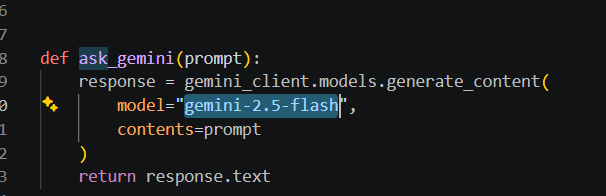
Here is a spreadsheet template you can use:
AI Visibility Tracker – Development Summary
Objective
Build a Python-based AI visibility tracker that checks whether Simply Sansu appears in responses from leading AI assistants for a predefined list of prompts and stores the results in a CSV file for monthly tracking.
What I Tried
- Started with a Python script using the OpenAI API only.
- Expanded the tracker to support multiple AI providers:
- OpenAI
- Google Gemini
- Anthropic Claude
- Perplexity
- Moved API keys out of the source code into a
.envfile usingpython-dotenv. - Replaced the hardcoded prompt list with a
prompts.txtfile so prompts can be managed without editing the Python code. - Consolidated results from all providers into a single CSV file.
Testing Performed
OpenAI
- Successfully authenticated using the API key.
- API requests failed due to insufficient API quota (429).
- Conclusion: Code is working; API billing/credits are required.
Google Gemini
- Initially used older model names (
gemini-2.5-flash/gemini-2.5-flash-lite), which returned model availability errors. - Listed all models available to the account.
- Tested the API separately using
test_gemini.py. - Confirmed the API key and SDK were working.
- Updated the tracker to use a supported Gemini text model.
- Result: Gemini integration works successfully.
Anthropic Claude
- Authentication succeeded.
- API requests failed because the account had no available API credits.
- Conclusion: Code is correct; API credits are required.
Perplexity
- Integrated using its REST API with the
requestslibrary. - Successfully retrieved responses and detected brand mentions.
- Result: Perplexity integration works successfully.
Final Setup
The tracker now:
- Loads API keys from
.env. - Reads prompts from
prompts.txt. - Queries multiple AI providers.
- Detects whether the brand is mentioned.
- Stores all responses in
ai_visibility_results.csv.
Related reading: